Monday, August 20, 2012

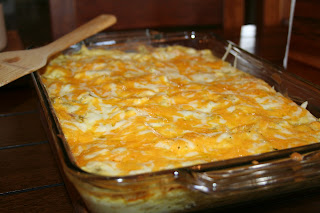
Country Platter: Dinner #5 White Chicken Enchiladas


It was May of 2009. 

I was shoveling these bad boys in my mouth and drooling at the same time. 

And I was on a date. 

No dish in the world triggers memories of my courting days with D more than these enchiladas. 

This was the first dinner he ever made me. 

I was convinced then that I would keep him. Forever. And nothing would stop me!! 

Muhuhuhuhhahahaha!!! 

These enchiladas are kid-friendly, easy-peasy, and scream 'comfort food'. 

And the best part? There's no rolling involved. There's just something I hate about rolling enchiladas. A lot. 

What You'll Need: 
1 can cream of chicken soup
1 can shredded chicken
1 can green chilies
½ cup sour cream
1 cup cheddar cheese
1 cup mozzarella cheese
corn tortillas (around 10)

NOTE: This recipe list will fill one 9x9 pan. If you're working with a 9x13, go ahead and double the ingredients. Also, when I made these tonight, I was making enough for a 9x13 plus another family who just had babies. So don't be freaked out by the quantity of filling in my bowl. I quadrupled this recipe tonight.


Preheat your oven to 400 degrees F.


Combine the cream of chicken, shredded chicken, green chilies, and sour cream in a bowl like so. 


Mix it all up nice a purdy. 

Now take a spatula, and cover the bottom of your pan like ziss... 

Throw some cheese on there.

Then add a layer of corn tortillas. They can be yellow. They can be white. Whatever tickles your fancy. I break them in half, and put them around the edges, then fill in the middle. It's rocket science. Really. 


Repeat the chicken mix, cheese, tortilla layering until you run out of chicken mix. You do want to make sure you end with the chicken mix. Generally, my goal is to get three layers of tortilla in there. That's usually perfect. 

Top with more cheese and get ready to throw this bad boy in the oven. At this point, you can also cover and freeze if you feel so inclined. These freeze really well, and since everything is already cooked, you don't have to worry about how they'll heat up later. They do great! Just make sure they're nice and sealed so's you's don'ts haves any freezer burn. 

Don't ask. It's late and I'm tired. 

Okay it's 7:30pm and I'm tired. 

I'm tired. 

Bake for approximately 30 minutes, or until the dish is bubbling. There's a fine balance between gooey, melty, delicious cheese and over-cooked rubber cheese. So watch it. 

Let those bad boys rest for 5 minutes before serving. 

Don't forget, these are layered enchiladas, not rolled, so you don't have to go fishing for the seam. Just cut into them and serve! Yet another reason why rolled enchiladas are inferior. Just sayin'. 


SIDES: I serve this with the most amazing corn chips on Planet Earth, and black beans. The chips are Juanita's, and I'm serious... once you buy these, nothing else will ever be good enough. Ever. I buy ours from Winco. Eight bags at a time!

As for the black beans, I grab a can, I open it, I dump the entire contents ("sauce" included) into a small saucepan, I add garlic salt, and I boil/simmer those suckers for about 20 minutes. They thicken up and become really tender, and the garlic salt adds such a beautiful touch. I don't even like beans, per say, and I eat these. Yum.

GROCERY LIST: 
cream of chicken soup
shredded chicken
green chilies
sour cream
cheddar cheese
mozzarella cheese
corn tortillas

Saturday, August 18, 2012

Country Platter: Dinner #4 -- Spinach & Artichoke French Bread Pizza


Long name, amazing meal. 

That should be the subtitle of this post!

This is probably the most shocking meal of my list. I say so because it's the one that, when I tell people about it, solicits the response, "And D eats that?!"

Yep. D eats it, alright. And he loves it! 

I came across this recipe originally in a magazine. Rachael  Ray's magazine baby!! 

You can view the original recipe online here.

Now onto business... 

What You'll Need:
1 loaf french bread, cut in half long ways (think Elementary School... hotdog style!) 
2 tablespoons butter 
2 tablespoons olive oil
1 onion, chopped 
3 cloves garlic, finely chopped
Salt and pepper 
3 tablespoons flour 
1 1/2 cups milk 
1 pinch nutmeg 
(2) 10 ounce boxes  frozen spinach, thawed and squeezed dry (or 1 can spinach, drained)
(1) 9 ounce box  frozen artichoke hearts, thawed (or 1 can artichoke hearts, drained)
1/2 cup grated parmigiano-reggiano cheese (if I'm not feeling fancy, I just use shredded parmesan)
2 cups shredded mozzarella
 
Preheat your oven to 400 degrees F . Put the bread on a baking sheet, soft side up. 

In a medium skillet, melt the butter with the olive oil, over medium heat. 

Add the onion and garlic and cook until softened, about 5 minutes; season with salt and pepper. 

Whisk in the flour for 1 minute, then whisk in the milk and season with the nutmeg. 

Cook until thickened, about 5 minutes. 

Pull the spinach apart, then add to the sauce. 

Fold in the artichokes and cook until heated through. 

Stir in the parmigiano-reggiano, season with salt and remove from the heat. 

Spread the spinach and artichoke mixture on the bread and top with the mozzarella. Bake until the cheese is melted, 10 to 12 minutes. 

NOTE: You'll notice in my pictures the presence of another glorious food, namely, bacon. Sometimes I get a wild hair and spinach/artichoke pizza just isn't good enough. So I add things like bacon. D never complains. This is your right as a cook, and it is what will make you a good one. Reading recipes is fine and dandy, but someday you will be comfortable enough in the kitchen to add your own flare to dishes. That's when you REALLY begin to enjoy cooking!! 


GROCERY LIST:
french bread
butter
olive oil
onion
garlic
salt
pepper 
flour 
milk 
nutmeg 
frozen or canned spinach
frozen or canned artichoke hearts
parmigiano-reggiano cheese (or just shredded parmesan)
mozzarella

Friday, August 17, 2012

Country Platter: Dinner #3 -- Pulled Pork


This is what our freezer looks like each February. Now ain't that a beautiful sight? That is homegrown pork right there. Low-stress, belly-rubbed, leftovers-eating, fresh-water-drinking, and pasture-grazing pigs made that meat. They fulfilled their ultimate purpose on this Earth, and for that I will always be grateful.

We ask for simple cuts when we slaughter our pigs.

Bacon, pork chops, pork steaks, roasts, and grind. That's it.

This recipe calls for pork steaks or roasts, and you can buy them at any local grocer. A shoulder roast or "butt" is most flavorful. No giggling.

There are few things in this world which smell as heavenly as bbq in the crockpot. Gracious. It's a wonderful smell to come home to.

My favorite day of the week for this meal is Sunday. The recipe is so simple. You throw it together in the morning, and when you step in the door from church meetings, you are overwhelmed with a sense of h-o-m-e. Mmmmmmmm. I love home.

What You'll Need:

2 pork steaks (or 1 pork roast) <--- They really turn out about the same. Shredded, they taste and look very similar.
1 bottle bbq sauce (Our personal favorite is Sweet Baby Ray's. Holy moly.)
1 small onion
Buns or Tortillas

Place your pork cut in the crock pot. NOTE: It does not need to be thawed. You may need to add an hour to cooking time, but it won't hurt anything if the pork is still frozen. Yay! 

Dice your onion. Add your onion and 1 cup water or chicken broth to the crock pot and set it on LOW.

Cook on LOW for 8-10 hours.

Drain the water/juice from the meat, shred with your hands (let is rest awhile because it is H-O-T!) or a fork, and add a generous amount of your favorite bbq sauce. Take a little taste and add salt, pepper, seasoned salt, and any other favorite herbs as necessary.

Now you just need to decide whether you want to eat this lovely creation burrito style, or on rolls. I prefer rolls, personally, but that's because I enjoy baking bread.

Like this...


This is just my bread recipe again, but instead of forming loaves, I form dough balls and you wind up with beautiful buns instead!!! Mmmmm hmmmmm. Don't mind that missing bun there on the right. Ha!

Sides: Grain/Starch - rolls or tortillas
            Vegetable - broccoli
            Fruit - pineapple or grapes

GROCERY LIST:
pork roast
bbq sauce
onion
tortillas
FOR ROLLS:
flour  
sugar  
baking powder  
salt 
yeast
wheat gluten
milk  
olive or vegetable oil
eggs
butter

Enjoy peoples!!!! Sorry I don't have any photos of this dish. If I make it soon, I'll add them later!

Thursday, August 16, 2012

Country Platter: Dinner #2 -- Homemade Pizza


We are a pizza loving family in this house. 

We love pizza so much, we have a night each week dedicated to it's goodness. 

Saturday night is Pizza Night. 

I look forward to Saturday every day of the week!!!! 

Now I'll warn you, my pizza is serious business. The crust is thick. The cheese is thick. And I make two of them every week because D loves pepperoni (no bueno) and I love many other varieties. Once again, D is a loyalist. I am a lover of change. I make several different pizzas to keep myself interested. Dirty rotten lover of change. 

Now I'll let you in on a little secret... 

My pizza dough recipe may look extremely familiar to some of you. 

That's because my pizza dough recipe is my bread recipe. 

Tada!!

I have tried many different recipes for pizza dough over the years. One of my favorites comes from my sister, Leah, and my brother-in-law, Jon. (<----- He's John the Baptist if you ask my son. Hehe. Another story for another time.) 

Leah and Jon also have pizza night. They were our inspiration. The wind beneath our wings. 

Anyways... I have a husband who LOVES a soft, thick crust. He also loves my bread, so one week I decided to try using my bread recipe and removing the second rising time so it didn't get TOO fluffy. I didn't tell him. I just let him dig in. It was one of those glorious moments in my life wherein I felt like Wonder Woman. He loved it. A lot.

What You'll Need: 

For Dough:
5-6 cups flour 
1/4 cup sugar  
1 Tablespoon baking powder  
1 Tablespoon salt 
2 Tablespoons yeast
1/4 cup wheat gluten
2 1/4 cup milk  
1/4 cup oil
1 egg

Mix together 2 cups flour, sugar, baking powder, salt, yeast, and gluten. 

In another bowl, combine the milk and the oil and heat until very warm (around 2 minutes in the microwave) - you should be able to stick your finger in it comfortably, but barely.

Add liquid to flour mixture. 

Mix with a whisk for 3 minutes. (I mix my breads by hand as I do not have a mixer - if you want to use one just mix for 1 minute low and 3 minutes medium speed.) 

Add the egg. 

Stir in 3-4 cups flour, and fold flour into the dough until it is thoroughly incorporated. 

**This dough is a tad darker than usual because this was for bread and I added flax and wheat germ to the mix**

Oil a large bowl and put your dough ball into the bowl with a little oil on it so it doesn't dry out. Cover and let rise 40 minutes. It does need to be warm. In the summer it's fine, but in the winter I turn my oven on for just a moment and then put the bread bowl in the oven, still covered, with the oven off. The residual heat helps it rise beautifully!

***NOTICE: If you're familiar with my bread recipe, this next part is the only difference... I skip the second rising time (once dough is formed into loaves) and I go straight to making the pizza***

Split the dough into two parts (for two pizzas) and roll onto your pizza pan. My sister uses a stone because they like their crust crispy on the bottom. My husband likes his pizza crust super soft so I use a metal pizza pan with holes in it. 

Continue to work the dough out towards the edge of your pizza pan. Press out from the middle with your fingers until the dough reaches the outer edge with ease. Then poke holes all over the dough with a fork. It's kinda fun!! 

Now for your sauce and toppings... 

First, let's talk about pizza sauce. I like to be able to tell it's there, but barely. We use a simple sauce. Canned tomato sauce, a little basil, and garlic salt. That's it. Combine the three, and then spread a small amount of sauce onto your pizza dough. Seriously... don't go overboard. You'll thank me later. 

Next, a layer of cheese. We use shredded mozzarella and cheddar. I buy it in bricks and shred my own because pre-shredded cheese is coated in potato flour or other "anti-binding agents" to keep it from sticking together, and it never melts as well once it's had that crap on it. 

Then I add my toppings. 

(At this point you'll want to preheat your oven to 350 degrees F.)

There's always a classic pepperoni for my pizza purist. 

For me? 

BBQ Chicken (Canned chicken, bbq sauce, top with fresh cilantro. Heaven.)

Canadian Bacon & Pineapple (Pretty self-explanatory.)

Taco (Corn chips, black beans, taco meat, tomatoes, lettuce. Yum!)

BLT (Bacon. Lettuce. Tomato. Overeat.) 

And sometimes I go crazy and make one of these little numbers... 

Spinach & Artichoke Pizza. I've got a post coming later on this bad boy. Holy canoly ravioli. 


Once you have your toppings just the way you like them, make sure you top each of them off with a layer of shredded cheese, and bake @ 350 degrees for 20-30 minutes.

NOTE: I do bake two pizzas at once in our oven. Let them bake for about 10 minutes and then swap their positions so each gets golden on the bottom and top. If I have one pizza that's thicker than the other (say I have a pepperoni and a thick bbq chicken) I always let the thick pizza finish baking on top so the upper portion gets nice and done.

Now take them out, slice them up, say a little prayer, and stuff your face!! 

Oh and if you've never tried it, drizzle your pizza slice with ranch dressing, and top with a sliced tomato. Then eat it with a fork and knife. It is pure goodness. Magic, I tell you.

GROCERY LIST: 
flour  
sugar  
baking powder  
salt 
yeast
wheat gluten
milk  
olive or vegetable oil
eggs
tomato sauce
basil
garlic salt
mozzarella cheese
cheddar cheese
*your choice of toppings


Wednesday, August 15, 2012

Country Platter: Dinner #1 -- Porkchops


Because we raise our own pigs each year, we enjoy some of the most amazing chops on the planet. There is something to be said about a chop that comes from a pig who ate chocolate cake and got it's belly scratched on a regular basis during it's tenure on this Earth. We love our pigs. We take good care of them. We name them. We thank them for their sacrifice. And we kiss them.

Okay I kiss them. They're cute!!

I digress...

Porch chops are a wonderful, traditional dinner, and you can enjoy them even when you don't raise your own pigs.

Confession time.

Last week we fed the Elders, and we ran out of pork chops back in March.

I bought Winco chops.

And they were delicious.

Now, I am not condoning supporting the "dirty meat market" as I like to call it. We MUCH prefer homegrown, grass fed (and sometimes chocolate cake fed) meat. But I'm also practical.

Sometimes you have to eat Winco meat.

I love SPAM so I can say that. Ha!

I digress yet again.

In the winter, I throw these bad boys in the crock pot with a roux/gravy base/cream of mushroom sauce and cook them on low until they reach Heaven. They quite literally fall apart.

In the summer, we bbq them, because all meat should have some fire put to it's arse at some point. It brings out the Mr. Hyde in all meat.

Whatever way you choose, here's the info:

What You Need: 

Pork Chops - bone in (there is great truth in: "nearer the bone, sweeter the meat")
Olive Oil
Garlic Salt
Seasoned Salt
(2 small cans) Cream of Mushroom Soup/Roux Base (only if these are going in the crockpot)

If the chops are frozen, thaw them.

Once thawed, brush each side with olive oil. This is a rule I use for all meats - especially in they're being fried or bbq'd. It really locks in the flavor, and helps the meat brown without sticking to your pan/grill.

Sprinkle each side with garlic salt, and seasoned salt. If I'm feeling crazy, I may follow it up with sea salt. Hey - I said variably healthy!!

If they're going in the crockpot: Place enough undiluted Cream of Mushroom soup in the crockpot to cover the bottom. Place your chops on top. If you are feeding enough people to warrant stacking, place a layer of Cream of Mushroom between the chops. Cover with the remaining Cream of Mushroom and cook on Low all day. This needs to be at least 6 hours, or you can do on High for around 3. But they're best if they're cooked on Low for 6-8. You can also add veggies, onions, etc to your crock pot if you so choose.

**Please Note: I have been trying lately to move away from "Cream of" soups. I don't like things with MSG in them. You can always buy this Cream Soup Base Mix from Augason Farms. It costs $13.19 for over 3 lbs of the stuff and it will last you forever!! MSG-free, and delish. You just add water and you have an incredible "cream of soup" style base. If you're feeling really zealous, you can always make a roux/gravy base yuorself!

When these chops are ready, they should literally fall off the bone. Just stick a fork in them. If they remain intact, they need more time. When you're ready to serve, you'll probably need to do so with a ladle. And watch for the bones. You don't want guest unknowingly biting into one of those. :) Not that it's EVER happened to me!!!

If they're going on the BBQ: Preheat your bbq on medium.You want heat. For sure. But you don't want the juices from the chops to cause the flames to shoot up and burn the meat either.

Place the meat diagonally on the hottest part of your grill, and don't mess with it for at least 6 minutes. People oftentimes touch meat on the grill too much because they get nervous. Leave it the heck alone for a few and let it do it's thing. Shut the lid so the heat gets trapped in there, and only check on it to make sure the flames aren't blackening the chops. We generally bbq chops for around 8 minutes one side, 8 minutes the other side, and then D opens the lid and watches them for the last few minutes.

Cut into one to see if it's done. Just a little bit so you don't lose all the juice. When they're ready, put them on a platter, cover them loosely with foil, and again - leave them alone for five minutes. It takes that much time for the juices to re-distribute throughout the meat. This is the best way to ensure a juicy cut. Let it rest a little. You'll have just enough time to get people seated and say a prayer!

Sides: Grain/Starch - baked potato, garlic pasta, stuffing, rice or garlic bread
           Veg - broccoli, green beans, or peas
           Fruit - Grapes or Watermelon (I'm stuck on these right now because it's Summer!!!)


Country Platter: 30 Meals Guaranteed to Please


I L-O-V-E to cook. 

A lot. 

I find exquisite satisfaction in watching my husband eat a meal I've prepared. And if he goes back for seconds? 

Oh my word. 

Thirds? 

Stick a fork in me - I'm done!!

My D is not a complicated man, nor a complicated eater. It's a beautiful thing. He loves simple, hearty, variably healthy, country meals. I say "variably healthy" because I believe in butter, I fry occasionally, and I don't generally sacrifice taste for low-fat recipes... cornbread is just undeniably more delicious when it's baked with a layer of bacon grease at the bottom of the pan. There. I said it.

However, we do eat a ton of fresh fruits and veggies, many of which are a result of our own sweat and toil in our family garden (during years when I'm not having twins) and when we don't have access to in-season fruits and veggies, we still eat frozen or canned, many of which - again - were frozen or canned by yours truly. 

Now a little background: 

During the first year of our marriage, I would regularly bust out a new recipe. An unknown

Oooooooohh...

After several mediocre meals, I made a total flop of a dinner (pumpkin soup baked in the shell) that even I wouldn't eat, which is saying a lot. D - in only a way he could - let me know that it was okay if I didn't add new recipes to my repertoire. He expressed his appreciation for the old stand-by's and told me he didn't mind one bit if we ate the same meals every 30 days for the rest of our mortal lives. 

I bucked at the notion for awhile. No new recipes?!? The same old thing for my husband every month?!?! Hogwash!!! I wouldn't have it. However, after being married to him for nearly three years now, I'm finally realizing that D doesn't say anything he doesn't mean. 

Ever. 

And suddenly, I was struck with a few glorious realizations...

I didn't have to plan menus anymore. 

I didn't have to sit at the dining room table with 15 recipe books and come up with 30 NEW dishes for September. I didn't have to then write down a grocery list for said dishes. 

And the best part? Because I followed D's counsel, today I don't have to follow a recipe for any one of my 30 stand-by's. I know them like the back of my hand. 

Oh mama. 

I've decided these tried and true meals are too good not to share. As I mentioned before, they are anything but fancy. They are anything but complicated. And they are anything but vegan.

I will be sharing one recipe per post until we hit the end of my list. I will include a grocery list for each meal, as well as ideas for sides and such. 

I'm even throwing around the idea of adding bonus posts every once in awhile... perhaps "winter-only meals" or our favorite desserts!

So without further ado...

1. Pork Chops
2. Pizza
3. Pulled Pork Sandwiches/Burritos
4. Spinach & Artichoke French Bread Pizza
5. White Chicken Enchiladas
6. Chicken Fried Steak
7. Cornbread Chili Bake
8. Meat Loaf
9. Tater Tot Casserole
10. Stuffed Bell Peppers
11. Baked Ziti
12. Red Beans & Rice
13. Chicken Pot Pie
14. Spaghetti
15. Lasagna
16. Patty Melts
17. Fish Sticks
18. Pan-Fried Chicken Breast
19. .Zuppe Tuscana
20. Meatballs
21. Fajitas
22. Orange Chicken
23. Chicken & Rice
24. Avacado Chicken Parmesan
25. Sloppy Joes
26. Homemade Hamburger Helper
27. Chicken Tenders
28. BBQ Burgers
29. Grilled Cheese
30. Stuffed Jumbo Shells


MEAL #1: Pork Chops (BBQ'd or Crockpot -- just depends on the season!)


**COMING SOON**


Tuesday, August 7, 2012

Why Use Coconut Oil?!?!


I am a big fan of Laura over at the blog Heavenly Homemakers... not just because of her awesome name either!!

She is a wonderful advocate of the healthy living, homeschooling, bulk food buying, country goodness that I love so much.

Today she shared a great deal on Coconut Oil! Coconut oil is used for all sorts of different things, but to name a few:

-baking
-skin care (especially for those with sensitive skin or eczema)
-frying foods (SO much better for you than other oils like canola, vegetable, or even olive oil)
-making granola bars
-popping popcorn

...among many others!

Read Laura's post on "What To Do With Coconut Oil" for more ideas and recipes.

Read Laura's post on "Why Coconut Oil Is Good For You" here.

And then follow her advice and go buy some at Vitacost for an incredibly low price so you can try it out!

You can read her post about it here. Or you can follow my instructions below!

This month, VitaCost is offering free shipping when you purchase $25 worth of their VitaCost Brand products.  Their 54 ounce tubs of VitaCost Brand Organic Coconut Oil are $20.99 each. If you are a new customer with Vitacost and you first sign up through this referral link, you will receive an email with a $10 credit code which you can use to make your purchase.  Then if you use your $10 referral code, you get free shipping and your cost is only $31.98 or 30¢ per ounce!!

So if you so choose...  
  1. Click on this link to sign up for a referral credit.  Vitacost will email you a $10 credit code.
  2. Put two 54 ounce tubs of VitaCost Brand Organic Coconut Oil into your cart. Your subtotal at this point should be $41.98.
  3. Enter your $10 referral credit code in the “If you have a promo code please enter it here” box.  This will take your subtotal down to $31.98!
  4. Continue through the check-out process, receive your coconut oil a few days later, then make some Chocolate Chocolate Chip Muffins from Laura's Heavenly Homemakers blog - optional, but highly recommended.
  5. Bonus!  If you would like, you can refer your friends and family with your own referral code and receive Vitacost credit once they make a purchase.  :)

Sunday, August 5, 2012

Cocooning Counts!!


Our sweet Joseph...

These are our babies...

We haven't held them in our arms yet, but we love them all the same. I don't know what I'm going to do with myself once I can wrap my arms around those little bodies.

Oh. My. Goodness.


Our Porter boy...


 As we prepare for the birth of our boys, D and I have entertained the idea of "cacooning" our newborns. This phrase is used synonymously with "passive immunity" in the medical community. The idea is simple: until the wee ones are old enough to receive the necessary immunizations, they are surrounded only by people who have been immunized themselves. It's not a new idea. This practice is used regularly with premature babies, whose little bodies and immune systems are even more fragile than that of full-term newborns.


Speaking with our pediatrician, my OB, my sister (mother of an extreme preemie), and other friends in the Labor & Delivery/NICU professions just solidified our feeling that this is what we need to do. We already know our boys will be here sooner than expected. We pray every day that they can make it full-term, but there is always a chance they will join us before then. Not to mention, in the last month, Washington State declared a state of emergency, due to epidemic levels of the bacteria Pertussis sweeping the area. California had a similar outbreak in 2010, but it wasn't this bad. If numbers continue to rise there, we will feel the effects more and more here in Oregon.

So what does this mean for you?

It's simple, really.

We want friends and family to visit our home and meet the boys after their arrival. We are excited to have people come by! We only ask that those wishing to have contact with them in the first 6 months be vaccinated against Pertussis. That means the dTAP for children, and a Pertussis booster for adults. These vaccine should be given at least 2 weeks prior to contact with newborns for them to be most effective.

We fully understand the potential for this to be an inconvenience for some, however, after considering our options, and praying extensively as a family about this, we know this is the right decision for us. We have faith this will give our baby boys the best chance at a healthy start. 

Thank you so much for your patience and respect in this matter.

And please, if you have any questions, don't hesitate to email me, private message me, or comment on this post. We're open to talking about this decision. Much love to all of our friends and family!!!

Did I mention... 8-11 weeks?!?!?  

D & L Cherry

 _________________________________________________________________________________

Read the most recent National coverage of the Pertussis outbreak here.

Read the original blog post that gave us this idea here.

Read about using the "cocoon method" here - this blog post was written during California's major outbreak in 2010.

Read about the principle of "passive immunity" here.

Read updated information on Washington State's epidemic status here.